

With the advent of iOS 14, we got the opportunity to create a new experience for users of our applications. I’m talking about App Clips, a small excerpt from the full app version. As one of the developers in Miquido, I wanted to share my experience in creating them.
We will cover three topics – firstly, the preparation of the project. Secondly – how to create an App Clip, and, finally, I’ll mention a few things about testing and distribution.
Preparation of the project
When thinking about adding an App Clip to our application, we have to remember one basic rule – we need to use current code from our codebase. The App Clip is actually a snippet of our application. It uses the same models and views, so when we think about creating App Clips, we need to design our architecture accordingly.
If we’ve already prepared our application architecture in a modular way, adding an App Clip to it will be much easier. Otherwise, this is a good time to refactor. It will benefit us in the future, as adding more targets will be easier and faster.
Human Interface Guidelines
Before we open Xcode and dive into the details of implementing an App Clip, I would like to mention Apple’s Human Interface Guidelines. It’s a good practice to follow those, as Apple provides some of the best user experience tips.
Some of the most important points to keep in mind:
- Focus on essential features;
- Design a linear, easy-to-use, and focused user interface;
- Avoid requiring people to create an account before they can benefit from your App Clip
Creating an App Clip for iOS 14
Now let’s open the Xcode and load your project. Create a new App Clip target by selecting File> New> Target> App Clip. You’ll be able to use a Swift UI or Storyboard for the interface and a Swift UI or UIKit app delegate for the App Clip lifecycle. Choose the correct project and application, and then click Create.
Before we configure our URLs within the Xcode, we will need to create the associated domain file on our web server. In order to do that, we’ll need to create a file called apple-app-site-association, with JSON structure:

The value for apps should be the App Clip’s app identifier – <Application Identifier Prefix>.<Bundle ID>.
After we configure our apple-app-site-association file, we need to add an Associated Domains Entitlement to both our host app target and the App Clip’s target. Thanks to this, iOS will be able to handle the link that leads to the application. If the user does not have the full version of the app installed, the App Clip will be launched. If the full version is accessible. it will be launched as normal.
Any URL that runs the App Clip should be listed in the Associated Domains feature with the appclips prefix (e.g., appclips: test.example). They should also be listed under Associated Domains in the host application.

As I mentioned at the beginning, App Clip shares functionality with our full application, that’s why we have to decide what parts of code we want to share between two targets. When adding functionalities to App Clip, there may be a situation where some of the code from the full version of application will be unnecessary or we will have to add code only for its needs. In order to achieve that, we can use Active Compilation Conditions. We can decide which parts of the code are to be compiled to the full version of the application, and which only for the needs of App Clip. You can easily manage them in the App Clip target by selecting the Build Settings tab, then Swift Compilers – Custom Flags -> Active Compilation Conditions.


After adding the target and assigning appropriate functionalities to it, we can proceed to testing. You can run App Clip on a simulator or a physical device. To do this, you must provide the invocation URL as an environmental variable. This way, you can check how your App Clip behaves with different URL invocations and with different query parameters.
To access environment variables, select the App Clip target from the scheme drop-down list and click Edit Scheme. Select the Run action and Arguments tab. Under the Environment Variables heading, edit the value for _XCAppClipURL. If it’s not there, add it as a key and set its value as the invocation URL. Make sure the check box is selected. Apple suggests creating generic URLs that cover most of the use-cases for our App Clip experiences. If we need to specify one route that needs to be different than the default, add it as a different experience, with a new image, title and other parameters.

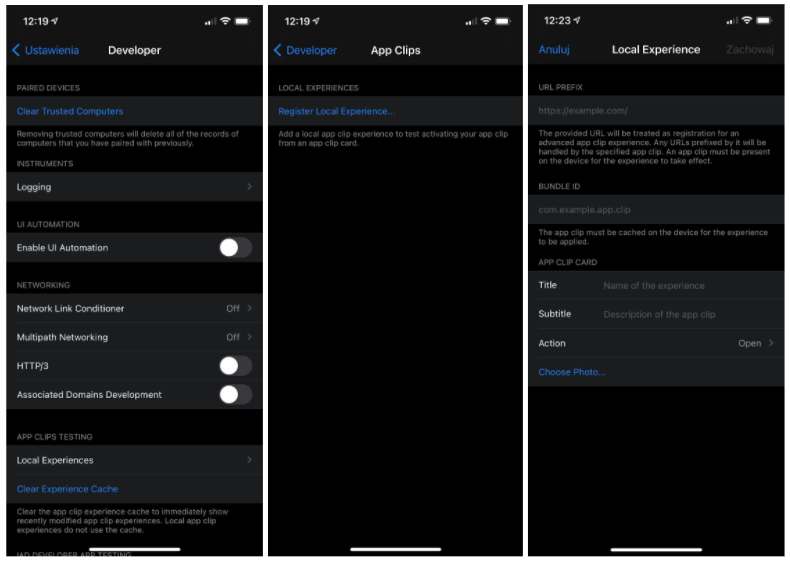
Testing App Clip Card
There is one important thing to remember – once you’ve built the App Clip target, you won’t see its card on your device. To test it, you need to add the so-called Local Experience, i.e. a local environment on a physical device. This is especially useful when testing QR codes or NFC tag calls. At the time of writing this article, Apple hasn’t released the tools necessary to create App Clip Codes yet, which are essentially Apple proprietary QR code. For our needs, we can easily substitute it with classic QR codes.
After installing App Clip on your physical device, go to Local Environments in Settings -> Developer -> Local Experiences, and select Register Local Experience. You’ll be prompted for:
- URL prefix that invokes the App Clip
- Copy for the App Clip card’s title and the subtitle
- A call-to-action verb
- A header image
- Your App Clip’s bundle identifier
Create or scan an NFC tag or QR code to trigger a local environment with a specific App Clip.
Prepare the Clip App for testing and distribution
Now that you’ve built your App Clip, it’s time to test and distribute it – we can use TestFlight for this purpose. We have to keep in mind that, similar to how users don’t install App Clips and how App Clips don’t appear on the Home screen, testers don’t install the beta version of your App Clip. Instead, testers launch the App Clip experiences you configure for testing.
There is an App Clip section in App Store Connect where you must provide the header image, subtitle, and action. This metadata appears in the App Clip Card. You can only edit this section after uploading the compiled file. After scrolling further down the page, we see the ability to add URLs for app reviewers to test App Clip. If you use query parameters, be sure to include at least two URLs for your tests.
Premiere time
After the testing by our iOS development services team is complete, it’s time to release our App Clip. This task is very simple – if we have planned to release the host application, App Clip will be made public to all users along with it. Our first App Clip is now released and ready for users to discover!

