
Creativity brings with it a constant desire to impress the user. For centuries, man has tried to manipulate the means available to recreate the most natural interaction, taking nature as a fundamental example.
When discovering the world, a person becomes more and more sensitive to the subtle details of the world around them, which allows them to instinctively distinguish artificiality from living beings. This line is blurred with the development of technology, where the software aims to create an environment in which its user describes his experience in an artificially created world as natural.
Echoing nature in app’s design
This article will introduce the process of blurring the border using the example of shape transformation in interactive animation of everyday elements in app development for iOS. One way of imitating nature is through various transformations of an object's position in time. Exemplary functions of animation time are presented below.
Combined with the right use of time by adding a geometric transformation, we can get an infinite number of effects. As a demonstration of the possibilities of today's design and technology, the Motion Patterns application was created, which includes popular solutions, developed by our software development services. As I am not a writer, but a programmer, and nothing speaks better than live examples, I have no choice but to invite you to this wonderful world!
Samples to discover
Let’s take a look at how motion design can transform a run-of-the-mill design into something exceptional! In the examples below, on the left side there is an application that uses only basic iOS animations, while on the right side there is a version of the same application with some improvements.
“Dive Deeper” effect
This is a transition using transformation between two states of a view. Built on the basis of a collection, after selecting a specific cell, the transition to the details of an element takes place by transforming its individual elements *. An additional solution is the use of interactive transitions, which facilitate the use of the application.
*actually copying / mapping data elements on a temporary view taking part in the transition, between its start and its end ... but I will explain this later in this article…
“Peek Over the Edge” effect
Using the scroll view animation in its action transforms the image in the form of 3D for a cube effect. The main factor responsible for the effect is the offset of scroll view.
“Connect the Dots” effect
This is a transition between scenes that transforms the miniature object into the entire screen. The collections used for this purpose work concurrently, a change on one screen corresponds to a shift on the other. Additionally, when you enter the miniature in the background, a parallax effect appears when you swipe between scenes.
“Shift the Shape” effect
The last type of animation is a simple one using the Lottie library. It is the most common use for animating icons. In this case, these are the icons on the tab bar. In addition, by changing the appropriate tabs, an animation of the transition in a specific direction was used to further intensify the interaction effect.
Dive deeper: our first motion design pattern
Now it's time to get to the point… we need to go even deeper into the structure of the mechanisms that control these examples.
In this article, I will introduce you to the first motion design pattern, which we named 'Dive Deeper' with an abstract description of its use, without going into specific details. We plan to make the exact code and the entire repository available to everyone in the future, without any restrictions.
The architecture of the project and applied strict programming design patterns are not a priority at this time—we focus on animations and transition.
In this article, we will be using two sets of features that are provided to manage views during scene transitions. Thus, I would like to point out that this article is intended for people who are relatively familiar with UIKit and the Swift syntax.
https://developer.apple.com/documentation/uikit/uiviewcontrolleranimatedtransitioning
https://developer.apple.com/documentation/uikit/uipercentdriveninteractivetransition
First: the structure
For the basic version implementing a given solution, several helper classes will be needed, responsible for providing the necessary information about the views involved in the transition, and controlling the transition itself and the interactions.
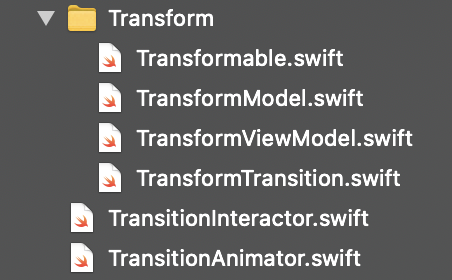
The basic class responsible for managing the transition, the proxy, will be TransitionAnimation. It decides which way the transition will take place and covers the standard functions needed to perform the action provided by the Apple team.
Based on the TransitionAnimator, we create a TransformTransition file, the task of which will be to perform a specific transition, transition with transformation (parenting)
The composition of the TransformTransition class includes the TransformViewModel, which, as the name suggests, informs the mechanism of which view models this transition will apply to.
The transformation model is an auxiliary class that describes the specific elements of the views involved in the transition located in the parent, usually a controller’s views that can be transformed.
In the case of a transition, it is a necessary step because this transition consists in the operations of specific views between given states.
Second: the implementation
We extend the view model from which we start the transition with Transformable, which forces us to implement a function that will prepare all the necessary elements. The size of this function can grow very quickly, so I suggest you break it down into smaller parts, for example per element.
The assumption is not to say how to search for the data of views participating in the transformation. In my example I used tags that represent a given view. You have a free hand in this part of implementation.
The models of specific view transformations (TransformModel) are the smallest model in the whole list. They consist of key transform information such as start view, transition view, start frame, end frame, start center, end center, concurrent animations, and end operation. Most of the parameters do not need to be used during the transformation, so they have their own default values. For minimal results, it is enough to use only those that are required.
Your attention may have been captured by phantom View. This is the moment when I will explain the workflow for iOS transitions. In the shortest possible form...
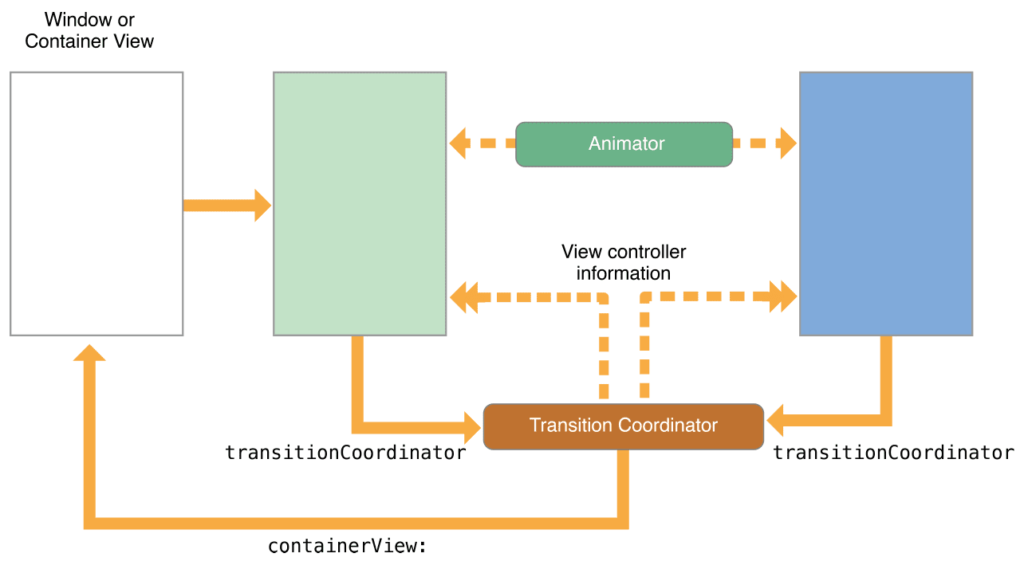
When the user wishes to move to the next scene, iOS prepares specific controllers by copying the start (blue) and target (green) controllers to memory. Next, a transition context is created through the transition coordinator which contains the container, a 'stupid' view that does not contain any special function, besides simulating the transition views between the two scenes.
The key principle of working with transitions is not to add any real view to the transition context, because at the end of the transition, all context is deallocated, along with the views added to the container. These are views that only exist during the transition and are then removed.
Therefore, the use of phantom views that are replicas of real views is an important solution to this transition.
In this case, we have a transition that transforms one view into another by changing its shape and size. To do this, at the beginning of the transition, I create a PhantomView of the given element and add it to the container. FadeView is an auxiliary view to add softness to the overall transition.
In the next step, I transform it to the target shape through transformations, and depending on whether it is a presentation or a recall, it performs additional operations to clean up specific views - this is the entire recipe for this transition.
Third: the special ingredient
After putting together all the functions, classes and protocols, the result should look like this:
The final component of our transition will be its full interactivity. For this purpose we will use a Pan Gesture added in the controller view, TransitionInteractor...
… which we also initialize in the controller body.
The ready interaction should be as follows:
If everything went according to plan, our application will gain much more in the eyes of its users.
Discovered only a peak of an iceberg
Next time, I will explain the implementation of related issues of motion design in the following editions.
The application, design and source code are the property of Miquido, and were created with passion by talented designers and programmers for the use of which we are not responsible for in our implementations. Detailed source code will be available in the future via our github account — we invite you to follow us!
Thank you for your attention and see you soon!

Top AI innovations delivered monthly!
The administrator of your personal data is Miquido sp. z o.o. sp.k., with its ... registered office in Kraków at Zabłocie 43A, 30 - 701. We process the provided information in order to send you a newsletter. The basis for processing of your data is your consent and Miquido’s legitimate interest.You may withdraw your consent at any time by contacting us at marketing@miquido.com. You have the right to object, the right to access your data, the right to request rectification, deletion or restriction of data processing. For detailed information on the processing of your personal data, please see Privacy Policy.
![[header] super app design principles & best practices](https://www.miquido.com/wp-content/uploads/2026/01/header-super-app-design-principles-best-practices-2048x1365.jpg.webp)
![[header] mobile app accessibility (1)](https://www.miquido.com/wp-content/uploads/2026/06/header-mobile-app-accessibility-1-1-2048x1365.jpg.webp)
![[header] hyperpersonalization in mobile (6) (1)](https://www.miquido.com/wp-content/uploads/2026/06/header-hyperpersonalization-in-mobile-6-1.jpg.webp)