Having a clear understanding of the product vision is essential in the early stages of a team’s work as it ensures that we’re all heading in the same direction. This is exactly what the purpose of a product discovery workshop is: to find all the answers we need in order to start a successful cooperation.
In this article, we’re going to go through the tips on how to build an efficient discovery workshops agenda, which will help you align your team behind a common vision of the product. You’ll get an example template of a discovery workshop agenda, alternative activities options that should meet your goals, and step-by-step instructions for how to run them with the team.
I will also explain the process of workshop organization and shed some light on the facilitation hacks and tricks. Let’s dive in!
What is product discovery?
First, let’s start with the basics.
A discovery workshop is a specific activity that aims to put key stakeholders and the development team in a room together for the specific purpose of:
- Exchanging the knowledge about business and product opportunities,
- Ideating the project objectives and discussing the expected outcome,
- Defining requirements like budget, staff and funding,
- Discussing functional specifications such as tech stack and end-user platform,
- Setting logistical expectations,
- Defining the Minimum Viable Product (MVP).
The type of workshop plan and output generated during the process will vary depending on the type of company or project and business goals. That said, there are general best practices that apply to any discovery session.
Discovery Workshops agenda
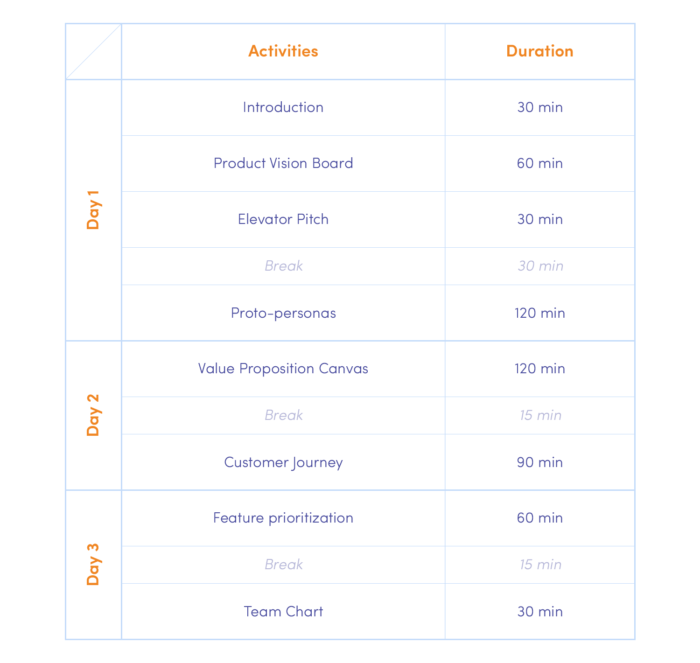
This is an example agenda that is designed to set you up with your product for up to three days. As all activities are quite challenging, there is no point to cover them all within one day.
It’s just one possible agenda though: you can pick the activities that are the best fit for your project team or pull in other activities as alternatives.
STEP 1 – The Goal
This step is the discovery phase of the project in which the main purpose is to define project goals. Usually, it aims to get everyone on the same page in terms of the project that you are going to start.
However, a workshop’s key deliverables may vary depending on how advanced the project is. It may focus more on users and their needs or rather on the business strategy. It’s important to discuss the expected outcome with the client and verify how much they are prepared for participation.
STEP 2 – The Team
Effective workshops require a diverse mix of perspectives. When planning them, take into consideration not only the team who might be developing the product but also those who know the target audience.
A Diverse group of 8-10 people that consists of:
- Facilitator
- UX designer
- UI designer
- Developers
- Product owner
- Product manager
- Project manager
- Stakeholders (business perspective)
- Stakeholders (customer perspective)
The well-chosen workshop participants are crucial to the effectiveness of the entire process.
STEP 3 – Product vision
Duration: 45 – 60 min
Imagine that you are starting a meeting. Usually, you should set a context for it – why the meeting has been scheduled and what is the expected outcome. In that way, you are able to conduct it more efficiently.
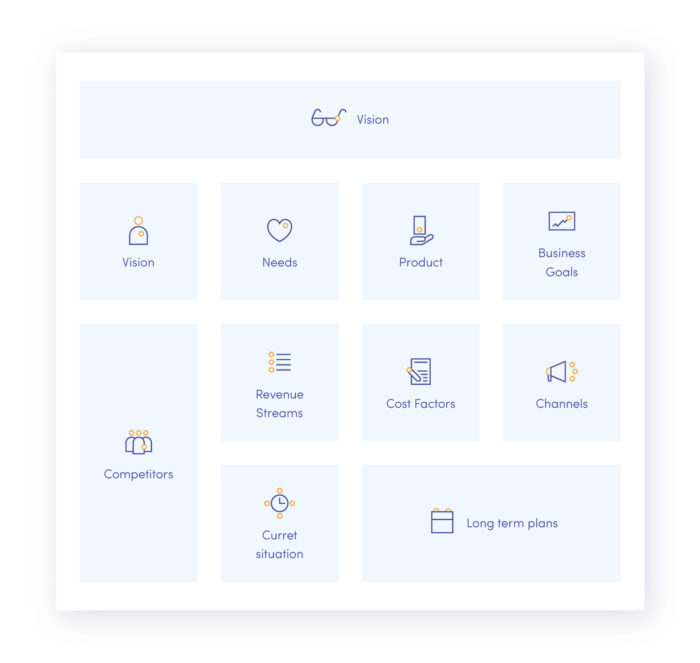
Use the same pattern with a Product Vision Board, which explains the current and the future state of the product and helps to set strategic priorities that are vital for the project’s outcome.
Since it captures the target group, user needs, key product features, and business goals, the board makes it possible to get a broader look at what the team wants to accomplish with the product and creates a shared understanding of what needs to be built.
The Product Vision Board was designed to describe, visualize, and validate a product vision and strategy. It is divided into 9 sections, each of them being placed to brainstorm the business context or overarching goal for the product and its potential users.
How to run the activity
- Describe the template and talk through each of the section
- Highlight the expected outcome of this activity
- Ask the team to brainstorm for each element in turn.
- Fill out the template according to the team’s suggestion
Alternative tools
If you are not sure the product vision is thought-through enough, or the team didn’t have much time to prepare for the workshops, here are examples of similar exercises that will help you to keep your team on the same page with the project’s goal.
Press release – this is a tool that covers the product’s goal and the benefit that it brings to the potential customer in a fun way. Ask your team to imagine that the product is ready and they have to announce it. The purpose of this exercise is to highlight the benefits, goals and make up a short description of the product.
Goals and risks – ask the product’s owner or the client to prepare a pitch presentation of their product. While listening to the presentation let the team list their thoughts or questions regarding the product’s goals and risks that might concern them. Review them all together after the presentation.
Once the product vision is completed and the team is on the same page with the expected outcome, take the conclusions from the canvas and use them in the next exercise.
STEP 4 – Elevator Pitch
Duration: 30 min
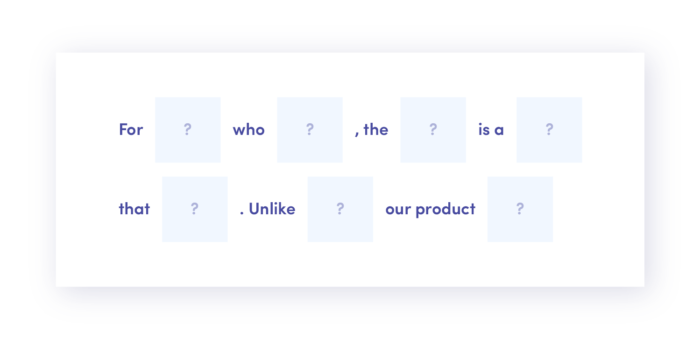
The elevator pitch describes the product in such a way that any listener can understand it in a short period of time.
Ask your team to brainstorm together in order to highlight what the product is for, why it is needed and what benefits it can bring to a customer. Obviously, the team members won’t be able to include all of these components in detail, but they should briefly explain the overall idea of the product and its value.
How to run the activity
- Describe the template and highlight its purpose
- Talk through all sections of the template
- Ask the team to start listing their ideas for each section in turn.
- Discuss all suggested ideas and finalize each section based on the conversation’s outcome.
Once the Elevator pitch is complete it is time to empathize with those, who are going to use it.
STEP 5 – Proto-personas
Duration: 60 – 120 min
Personas are fictional characters, which should be made up based on research in order to represent the different user types that might use the product. If you don’t have detailed research, you can use the collected info from the elevator pitch and product vision board to make first educated assumptions.
In that way, during these workshops, you can create proto-personas that catalogue the team’s existing knowledge (or best guesses) of who their users are and what they want.
Although proto-personas are criticized as there is no research behind them, for the workshop’s sake it is better to make any approach to empathize with users than none. Just keep in mind that the credibility of this approach should be reviewed along with the design process.
Use one of these templates:
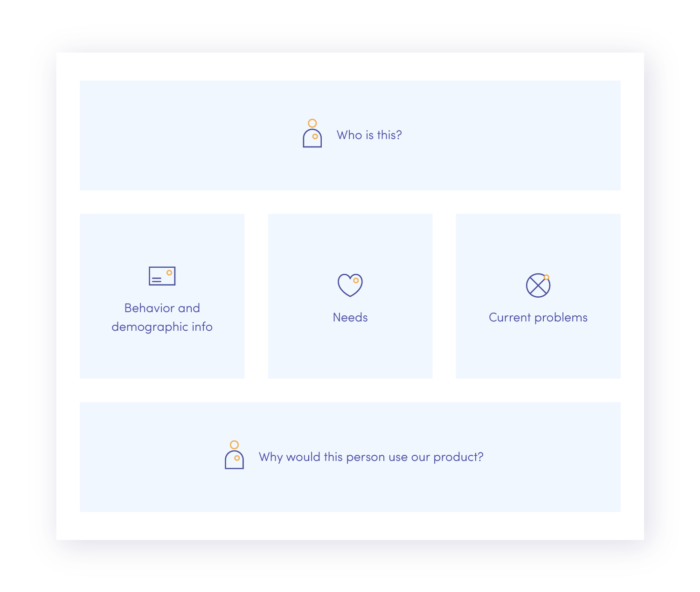
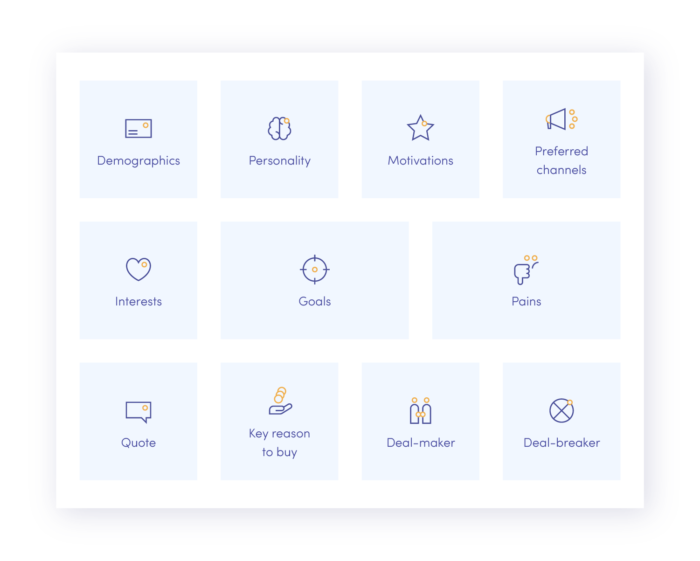
How to run the activity
- Describe the template and highlight its purpose
- Talk through all sections of the template
- Brainstorm your key customer types and pick the top three
- If there are multiple personas, split the team into smaller groups. Ask each group to cover one persona.
- Ask the team to start listing their ideas for each section in turn.
- When teams are ready, ask them to present their outcomes so the team and stakeholders can refer.
- As a group, rank the personas depending on their of importance. Consider who your most valuable customers are and who will get the most benefit from the product.
Once it is clear who you are going to build the product for, you are ready to answer the question about what should be designed for them.
STEP 6 – Value Proposition Canvas
Duration: 60 min
Depending on the desired outcome and the time available, there are multiple ways to brainstorm ideas and break them down into features that meet user needs.
At this stage, the primary purpose is to create a fit between the product and the market (read more about product-market fit) by making sure that the product is positioned around customers’ values.
In order to do that, use a Value Proposition Canvas that easily narrows down what should be created and to whom.
The canvas is divided into two sides – on the right side, there is a customer profile: their needs, pains and gains. On the left side, it’s the Value Proposition, where the team should define Pain relievers, Features and the Product itself.
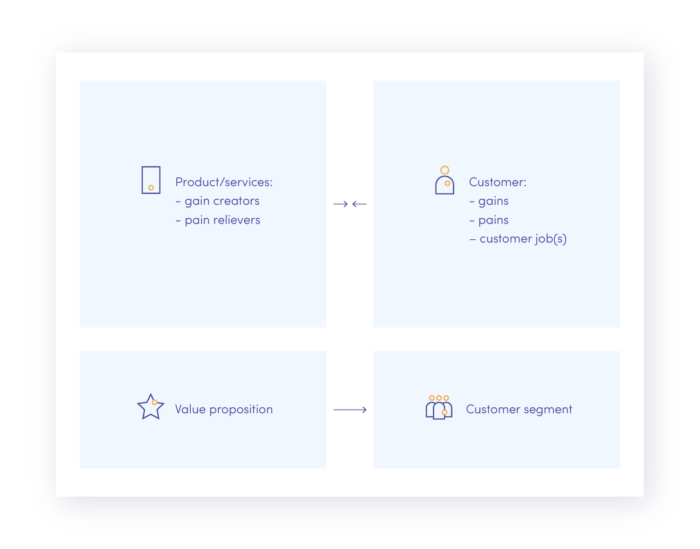
How to run the activity
- Describe the <template> and highlight its purpose
- Talk through all sections of the template
- Pick each of persona defined in the previous activities
- For each persona list their pains, gains and needs according to the template
- Then move on the left side of the canvas and try to brainstorm about potential solutions
- Repeat this activity for each persona. If there is not enough time, split the team into smaller groups and ask them to cover one persona each.
- When teams are ready, ask them to present their outcomes so the team and stakeholders can refer.
- As a group, rank the feature ideas in order of importance. Consider what your most valuable features are and who will get the most benefit from the product.
Alternative tools
Brain dump – this is taking all of the ideas and thoughts and transferring them onto paper. The point is to get all of the things that might be valuable for potential customers, list them and prioritize according to the impact they might have on the product. You can try this activity when the team is more technically oriented or when there are features already defined in the process.
Design session – this is a planning activity where the team discusses what features could be implemented to address user needs ending with a drawing session. The purpose of it is to list features and visualize them by drawing simple flows or designing particular screens. Just like brain dump, it is easier to run this activity once high-level features are already defined.
Since the team is aware of what features are on the table, now it’s time to plan how to design them.
STEP 7 – Map the customer journey
Duration: 60-90min
At this point of the workshops, we should have at least one business goal, one persona and a couple of features ideas. The purpose of running the customer Journey activity is to visualize how a customer interacts with the product by mapping out the actions they take to achieve their goal.
Remember that each persona should have their own customer journey, for you to be able to capture the big picture of how the product might address diverse customers.
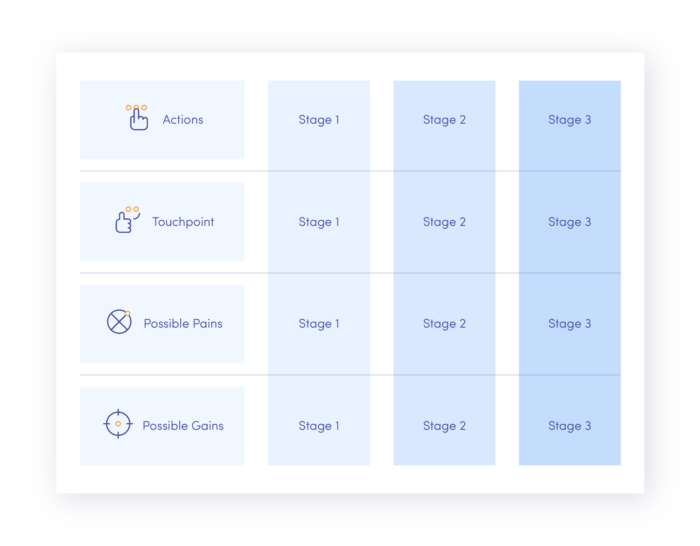
Ask your team to imagine a pro./to-persona to start using the product they are about to start working on and then follow these tips:
How to run the activity
- Set the primary goal a persona is about to achieve within the product. That will also be a goal for the customer journey.
- Once the goal Is set, focus on a person’s needs, pains and gains. List them out again or pin them next to the board.
- Then define their touchpoint with the product by describing actions they need to take.
- With every touchpoint and action, define what a person’s thoughts and feelings are.
- Repeat 3 and 4 until your persona would accomplish their goal and so the customer journey will end.
- As a group, review personal experiences. Identify their frustrations and think how you mitigate them.
Alternative tools
User Story Mapping – just like customer journey, it is a tool that arranges user activities into one path, except user story mapping covers the rough requirements for each activity kept in order of priority. This tool might be difficult or even impossible to run, unless you have an advanced definition of the product features. Therefore you might run this activity as a supplementary tool for customer journey or just as an alternative.
STEP 8 – Feature prioritization
Duration: 60-90min
It is impossible to define all requirements for the product within one workshop. Therefore try to focus on the least you can do to achieve your project vision. Keeping that in mind, make the very first decisions about features that deliver most value within a relatively short amount of time.
Here are some helpful techniques:
Eisenhower matrix – invented by the military officer, this framework was designed to help you prioritize a list of tasks by first categorizing those items according to their urgency and importance. It is divided into 4 sections: Reduce, Schedule, Delegate, Declutter. While running this activity it is crucial to keep the whole team engaged as they should make their decisions based on long and sometimes intensive discussions.
Effort/Impact matrix – similar to the Eisenhower matrix, it is a decision-making tool that helps to estimate each potential idea based on the level of effort required and the potential impact or benefits they will have. Decisions should be made together, as a team.
MoSCoW – this is one of the most popular techniques, which also divides the ideas into those that MUST, SHOULD, COULD and WILL NOT be implemented. It is very useful especially in terms of the MVP prioritization, as only those ideas kept in two first sections are the ones that need to be taken into consideration.
STEP 9 – Summary
Duration: 30-60 min
At this point, it should be clear why you’re building the product, who you’re building it for and what is the high-level feature scope. The last thing that should be discussed during the workshops is how your team is going to work together.
The purpose of this very last part of the workshop is to bond the team together, build a shared understanding and commitment and also plan the next steps after the workshop.
You’re more likely to get a great team when the members set the ground rules themselves. To help them out, follow the team charter framework, which should define basic team goals, obstacles, roles and responsibilities of everyone involved.
How to run the activity
- Ask your team what they appreciate the most while working on the project.
- Starting with values, you should also discuss: meeting details and frequency, technical practices, communication tools, roles and responsibilities
The charter should be accessible to the whole team at every stage of the product development process as a reminder of what has been established at the very beginning.
Alternative tools
Risk Matrix – once your team doesn’t need any introduction, here’s the alternative idea to cap off your discovery workshop. Its purpose is to visualize the potential risk related to the project, project timeline or even business obstacles that went through the teams’ heads during the workshop. Ask your team to brainstorm about their concerns, list them out and discuss them together including an action plan to mitigate them.
Final words
At this point you can discuss with your team the next steps once the product has been effectively discovered.
I hope these tips are useful and I’m keeping my fingers crossed for your success! And if you need a qualified team of experts to conduct your product discovery workshop or help you create a product strategy – don’t hesitate to contact us!
How can Discovery Workshop improve my business?
The Discovery Workshop is a great way to look at design challenges and problems from a different perspective. This makes it much easier to confront or prevent issues and creates a strong foundation for your project. The Discovery Workshop is crucial in terms of understanding and identifying design goals and challenges. The workshop also makes it much easier to define and achieve an MVP (Minimum Viable Product). Discovery Workshop will therefore help you deliver your project much more quickly and make it easier for you to prevent design mistakes that can have a negative impact on your business.
What are the Discovery Workshop tools?
It all depends on the form of the Discovery Workshops. If it is to be held in the office, then all you need are sheets of paper, pens, highlighters, etc. In the case of remote workshops, on the other hand, it is worth using tools such as FigJam or Miro, which will make the work much easier. It is also worth remembering to prepare an agenda or the necessary information about the project.
How should you prepare for the Discovery Workshop?
You can make running a Discovery Workshop easier by preparing for it properly. So it’s worth planning in advance what specifically you want to achieve, preparing all the necessary materials and information to facilitate the whole workshop process, as well as planning the meeting in detail and setting priorities. It is also important to get the workshop participants right to ensure a diverse approach. This will make the Discovery Workshop much more productive.
