
Writing apps with Flutter creates great opportunities for choosing architecture. As is often the case, the best answer to the question “Which one should I choose?” is “It depends”. When you get that answer, you can be sure you found an expert in programming.
In this article, we will go through the most popular screens in mobile applications and implement them in the two most popular Flutter architectures: Provider and BLoC. As a result, we will learn the pros and cons of each solution, which will help us choose the right Flutter architecture for our next module or application.
Brief introduction to Flutter architecture
Choosing the architecture for a Flutter project is of great importance, primarily due to the fact that we are dealing with a less commonly used, declarative programming paradigm. This completely changes the approach to managing the sate that native Android or iOS developers were familiar with, writing the code imperatively. Data available in one place in the application are not so easy to obtain in another. We do not have direct references to other views in the tree, from which we could gain their current state.
What is Provider in Flutter
As the name suggests, Provider is a Flutter architecture that provides the current data model to the place where we currently need it. It contains some data and notifies observers when a change occurs. In Flutter SDK, this type is called a ChangeNotifier. For the object of type ChangeNotifier to be available to other widgets, we need ChangeNotifierProvider. It provides observed objects for all of its descendants. The object which is able to receive current data is Consumer, which has a ChangeNotifier instance in the parameter of its build function that can be used to feed subsequent views with data.
What is BLoC in Flutter
Business Logic Components is a Flutter architecture much more similar to popular solutions in mobile such as MVP or MVVM. It provides separation of the presentation layer from business logic rules. This is a direct application of the declarative approach which Flutter strongly emphasizes i.e. UI = f (state). BLoC is a place where events from the user interface go. Within this layer, as a result of applying business rules to a given event, BLoC responds with a specific state, which then goes back to the UI. When the view layer receives a new state, it rebuilds its view according to what the current state requires.
How to create a list in Flutter
A scrollable list is probably one of the most popular views in mobile applications. Therefore, picking the right Flutter architecture might be crucial here. Theoretically, displaying the list itself is not difficult. The situation gets trickier when, for example, we add the ability to perform a certain action on each element. That should cause a change in different places in the app. In our list, we will be able to select each of the elements, and each of the selected ones will be displayed in a separate list on a different screen.
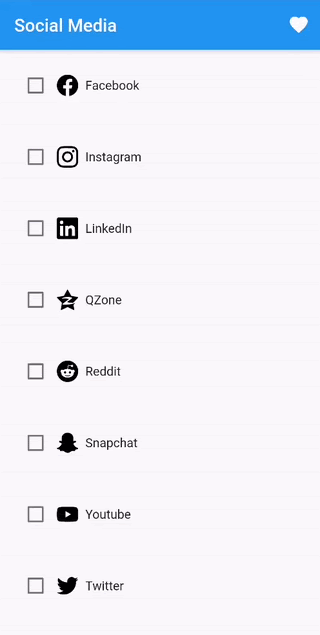
Therefore, we have to store elements that have been selected, so that they can be displayed on a new screen. In addition, we will need to rebuild the view every time when the checkbox is tapped, to actually show check / uncheck.
The list item model looks very simple:

How to create a list with Provider
In Provider pattern, the above model must be stored in an object. The object should extend the ChangeNotifier to be able to access SocialMedia from another place in the app.

Any change in this object, which will require rebuilding on the view, must be signalized using notifyListeners(). In the case of the setFavourite() method to instruct Flutter to re-render the UI fragment, that will observe the change in this object.
Now we can move on to creating the list. To fill the ListView with elements, we will need to get to the SocialMediaModel object, which stores a list of all the elements. You can do it in two ways:
- Provider.of<ModelType>(context, listen: false)
- Consumer
The first one provides the observed object and allows us to decide whether the action performed on the object should rebuild the current widget, using the listen parameter. This behaviour will be useful in our case.

We need a list of all social media but there is no need to rebuild the entire list. Let’s take a look at what the list item widget looks like.

We listen to the change in the checkbox’s value and update the model based on the check state. The checkbox value itself is set using property from the data model. This means that after selection, the model will change the isFavourite field to true. However, the view will not present this change until we rebuild the checkbox. Here, a Consumer object comes with help. It provides the observed object and rebuilds all of his descendants after receiving information about the change in the model.
It is worth placing Consumer only where it is necessary to update the widget in order to avoid unnecessary rebuild views. Please note that if, for example, the checkbox selection will trigger some additional action like changing the title of the item, Consumer would have to be moved higher in the widget tree, so as to become the parent of the widget responsible for displaying the title. Otherwise, the title view will not be updated.
Creating a favorite social media screen will look similar. We will get a list of favorite items using Provider.

When the build method is called, the Provider will return the current list of favourite social media.
How to create a list with BLoC
In our simple application, we have two screens so far. Each of them will have its own BLoC object. However, keep in mind that the selected items on the main screen are to appear on the list of favourite social media. Therefore, we must somehow transfer checkbox selection events outside of the screen. The solution is to create an additional BLoC object that will handle events that affect the state of many screens. Let’s call it global BLoC. Then, BLoC objects assigned to individual screens will listen for changes in global BLoC states and respond accordingly.
Before you create a BLoC object, you should first think about what events the view will be able to send to the BLoC layer and what states it will respond to. In the case of global BLoC, events and states will be as follows:

The CheckboxChecked event must be in the global BLoC, because it will affect the state of many screens - not just one. When it comes to states, we have one in which the list is ready to display. From the point of the global BLoC view, there is no need to create more states. Both screens should display the list and the individual BLoCs dedicated to the specific screen should take care of it. The implementation of the global BLoC itself will look like this:

The initial state is ListPresented - we assume that we have already received data from the repository. We only need to respond to one event - CheckboxChecked. So we will update the selected element using the setFavourite method and send the new list wrapped in ListPresented state.
Now we need to send the CheckboxChecked event when taping on the checkbox. To do this, we will need an instance of SocialMediaBloc in a place where we can attach the onChanged callback. We can get this instance using BlocProvider - it looks similar to Provider from the pattern discussed above. For such a BlocProvider to work, higher in the widget tree, you must initialize the desired BLoC object. In our example, it will be done in the main method:

Thanks to this, in the main list code, we can easily call BLoC using BlocProvider.of () and send an event to it using the add method:

We already have CheckboxChecked event propagation to BLoC, we also know how BLoC will respond to such an event. But actually... what will cause the list to rebuild with the checkbox already selected? Global BLoC does not support changing list states, because it is handled by individual BLoC objects assigned to screens. The solution is the previously mentioned listening to a global BLoC for changing the state and responding according to this state. Below, the BLoC dedicated to the main social media list with a checkbox:

When the SocialMediaBloc returns the state ListPresented, SocialMediaListBloc will be notified. Note that ListPresented conveys a list. It's the one that contains updated information about checking the item with the checkbox.
Similarly, we can create a BLoC dedicated to the favourites social media screen:

Changing the state in the global BLoC results in firing the FavouritesScreenStart event with the current list. Then, items one marks as favorites are filtered and such a list displays on the screen.
How to create a form with many fields in Flutter
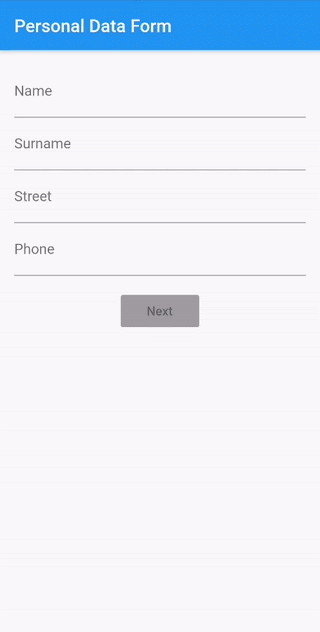
Long forms can be tricky, especially when the requirements assume different validation variants, or some changes on the screen after entering the text. On the example screen, we have a form consisting of several fields and the "NEXT" button. The fields will be automatically validating and the button disabled until the form is fully valid. After clicking the button, a new screen will open with the data entered in the form.
We have to validate each field and check the entire form correction to properly set the button state. Then, the collected data will need to be stored for the next screen.
How to create a form with many fields with Provider
In our application, we will need a second ChangeNotifier, dedicated to the personal info screens. We can therefore use the MultiProvider, where we provide a list of ChangeNotifier objects. They will be available to all descendants of MultiProvider.

In this case, PersonalDataNotifier will be acting as a business logic layer - he will be validating fields, having access to the data model for its update, and updating the fields on which the view will depend.
The form itself is a very nice API from Flutter, where we can automatically attach validations using the property validator and save the data from the form to the model using the onSaved callback. We will delegate validation rules to PersonalDataNotifier and when the form is correct, we will pass the entered data to it.
The most important thing on this screen will be listening for a change in each field and enabling or disabling the button, depending on the validation result. We will use callback onChange from the Form object. In it, we will first check the validation status and then pass it to PersonalDataNotifier.

In PersonalDataNotifier, we will prepare isFormValid variable. We will modify it (do not forget to call notifyListeners()) and in the view, we will change the button state depending on its value. Remember to obtain the Notifier instance with the parameter listen: true - otherwise, our view will not rebuild and the button state will remain unchanged.

Actually, given the fact that we use personalDataNotifier in other places, where reloading the view is not necessary, the above line is not optimal and should have the listen parameter set to false. The only thing we want to reload is the button, so we can wrap it in a classic Consumer:

Thanks to this, we don't force other components to reload each time we use a notifier.
In the view displaying personal data, there will be no more problems - we have access to PersonalDataNotifier and from there, we can download the updated model.
How to create a form with many fields with BLoC
For the previous screen we needed two BLoC objects. So when we're adding another "double screen", we'll have four altogether. As in the case of Provider, we can handle it with MultiBlocProvider, which works almost identically.

As in the BLoC pattern, it's best to start with the possible states and actions.

What is changing on this screen is the button state. We therefore need separate states for it. In addition, the InputFormCorrect state will allow us to send the data the form has collected.

Listening to changes in the form is crucial, hence the FormInputChanged event. When the form is correct, the FormCorrect event will be sent.
When it comes to validations, there is a big difference here if you compare it to Provider. If we would like to enclose all validation logic in the BLoC layer, we would have a lot of events for each of the fields. Additionally, many states would require the view to show validation messages.
This is, of course, possible but it would be like a fight against the TextFormField API instead of using its benefits. Therefore, if there are no clear reasons, you can leave validations in the view layer.
Button state will depend on the state sent to the view by BLoC:

Event handling and mapping to states in PersonalDataBloc will be as follows:

As for the screen with a summary of personal data, the situation is similar to the previous example. BLoC attached to this screen will retrieve model information from the BLoC of the form screen.

Flutter architecture: notes to remember
The examples above are sufficient to show that there are clear differences between the two architectures. BLoC separates the view layer from business logic very well. This entails better reusability and testability. It seems that to handle simple cases, you need to write more code than in Provider. As you know, in that case, this Flutter architecture will become more useful as the complexity of the application increases.
Provider also separates UI from logic well and does not force the creation of separate states with each user interaction, which means that often you do not have to write a large amount of code to handle a simple case. But this can cause problems in more complex cases. That's why choosing the right Flutter app development agency is essential to fully satisfy your digital product needs.
Click here to check out the entire project.

Top AI innovations delivered monthly!
The administrator of your personal data is Miquido sp. z o.o. sp.k., with its ... registered office in Kraków at Zabłocie 43A, 30 - 701. We process the provided information in order to send you a newsletter. The basis for processing of your data is your consent and Miquido’s legitimate interest.You may withdraw your consent at any time by contacting us at marketing@miquido.com. You have the right to object, the right to access your data, the right to request rectification, deletion or restriction of data processing. For detailed information on the processing of your personal data, please see Privacy Policy.

