Everyday when browsing the Web with security in your mind, you think about the famous green padlock near the website URL address in your browser and the HTTPS version of the data transfer protocol. In this article, we’re going to discover why HTTPS is really secure and how the communication is being safeguarded from eavesdropping by a third party.
First, we’ll briefly introduce the two basic cryptographic concepts: digital signature and encryption, we’ll dive into a process called SSL handshake, which is performed before the client and server start exchanging communication and is used to establish a secure cryptographic context. We’ll finish with information on how to increase the security even more with an optional step called client certificate authentication.
Public key cryptography 101: Key Pair
Meet Alice and Bob, two persons who decided to use cryptographic methods to exchange their private messages safely. The first choice they have to face is between two different cryptography types: symmetric and asymmetric key cryptography (also called public key crypto).
But wait, what are these keys? Basically, we can simplify that a key is a random sequence of characters. We can use this sequence to transform (do a certain cryptographic operation) on a message – we’ll dig into that soon.
Symmetric key cryptography
When using symmetric key crypto, a sender generates a key and then duplicates it for the receiver. The sender saves the original key, and a duplicate is delivered to the receiver. The same key is used for crypto operations on both ends of the communication.
And what are the key benefits and disadvantages of the symmetric key cryptography?
| Pros | Cons |
|---|---|
| faster crypto operations – only one key is used | sensitive key is endangered of being intercepted during transfer from sender to receiver |
| simpler setup, easier to understand | once the key is compromised, the communication is also compromised on both ends |
Asymmetric key cryptography
When using asymmetric key crypto, both sender and receiver generate a key pair – a public key and a private key. The keys are mathematically coupled with each other to work together in various crypto operations. Both the sender and receiver save their private keys securely, but they can exchange public keys with no special precautions. They can even use a sort of “public keys yellow pages” – a public key server to send their public keys to be accessible by anyone.
What are the pros and cons of the asymmetric key cryptography?
| Pros | Cons |
|---|---|
| sensitive private key never leaves the sender’s environment | lower crypto operations performance |
| when a private key is compromised on one end of the communication, the other one is still safe | game over when the private key is lost |
| more cryptographic operations available |
Since an asymmetric crypto setup is more secure, Alice and Bob decided to go with it! Now they can leverage that and start thinking about ensuring the security and integrity of the communication.
Public key cryptography 101: Encryption
When Alice sends a message to Bob, she wants to be sure that no one else can see what the content is. She decides to encrypt the message. To achieve that, Alice must first get Bob’s public key either from a key server or directly from Bob via a communication channel. Once Alice obtains the key, she can apply an encryption operation using Bob’s public key on the message she wants to send.
Generally speaking, in this process, the message is being taken by a cryptographic algorithm (a.k.a cipher) in blocks (most commonly) and some bit operations between the message and key are performed, producing an output which is the encrypted message (a.k.a ciphertext). When Bob gets the encrypted message, he is the only person who can decrypt it with his private key.
Note:
- Message encryption – sender encrypts a message with recipient public key
- Message decryption – receiver decrypts a message with their private key
Public key cryptography 101: Signature
Apart from preventing the message content from being revealed, it’s equally important to be able to confirm the sender’s identity and verify if the message was not changed. A digital signature (a separate object attached to the message) is used exactly for these two reasons.
Alice first uses a hashing algorithm to develop a message hash to generate her signature. Hashing is computing a one way mathematical function on a message which produces a shorter, fixed value output – different for a different input. Then she uses her private key to encrypt (sign) the generated hash.
Next, when Bob receives the message and the signature, he can first decrypt the signature using Alice’s public key. When that succeeds, he knows that the signature was really generated by Alice (otherwise, decryption with her public key would fail).
Secondly, Bob can take the message and hash it using the same algorithm that Alice had before and confirm that his hash of the message is the same as the one generated by Alice. When hashes match, he knows that the message was not tampered with.
Note:
- Generating signature – sender encrypts (signs) the message hash with his private key and creates a signature
- Verifying signature – receiver first decrypts the message hash from signature and checks if a hash computed by him matches the one from signature
- Encryption and signature can be used separately, but for the highest security, they are usually combined. Therefore, most crypto functions you can meet are called encryptSignMessage(), decryptVerifyMessage(), etc.
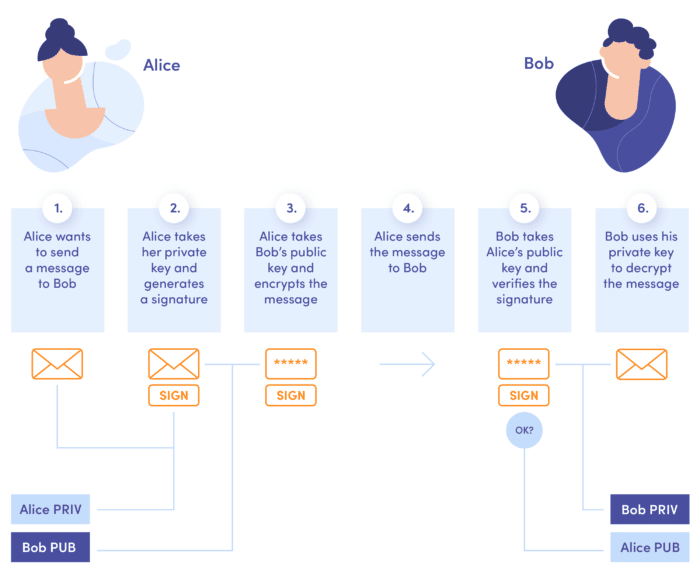
I hope you’re not having trouble keeping up with the Alice & Bob story. Let me illustrate the whole flow once again to ensure everything is clear and to sum things up.

- Alice wants to send a message to Bob
- Alice takes her private key and generates a signature
- Alice takes Bob’s public key and encrypts the message
- Alice sends the message to Bob
- Bob takes Alice’s public key and verifies the signature
- Bob uses his private key to decrypt the message
Alright, that’s enough theory. Now let’s see how all of this is used in HTTPS!
SSL Handshake
Say hello please
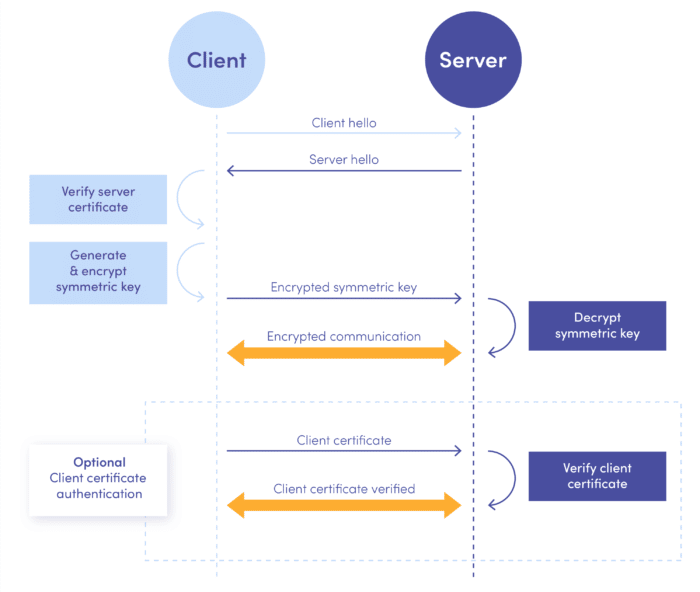
When a client initiates a connection to a server, it is first critical to make a proper introduction to establish cryptographic context for the rest of the communication. This can be done in the HTTPS CONNECT step, way before parsing headers and request bodies. It all starts with the client sending a client hello message.
Most importantly, the message contains the crypto algorithms that the client understands and some additional material, like supported compression algorithms, protocol versions, session id, etc. As the server likes to be polite, it also responds with a server hello message which most notably contains the server certificate with the server public key (yes, the process is based on public key cryptography – the same method that Alice and Bob chose).
Now it’s time to welcome our next guest at the stage: a certificate authority (CA). The name sounds serious – but it’s just a third-party entity with a lot of street credit that is basically considered trustworthy worldwide. Such an entity can validate a server’s identity and place their digital signature along with the server certificate (similarly to Alice when messaging Bob).
Certificate verification
Now let’s finally consider the title green padlock next to your browser’s URL address.
Each web client has a bundled list of well-known and trusted certificate authorities’ public keys. You might remember that at the beginning of the article, I mentioned that the signature is generated using a sender’s private key and can be verified using a sender’s public key. Well, this exactly is what the client does. It goes through the bundled trusted CAs list and checks if the signature of the server certificate belongs to one of the trusted CAs. If it does, it accepts the certificate – and that’s the moment when the padlock turns green.
But that is only a first step, which has nothing to do with security yet. Anyone can copy any public key certificate, put it on a server and present it to a connecting client, right?
After the client verifies the server certificate, it creates a symmetric key to encrypt the communication. But, as I mentioned at the beginning, the problem with symmetric keys is that they are vulnerable to being intercepted during transport. At this step, client and server do not have a common cryptographic context. So the client sends the symmetric key to the server, but it first encrypts it with the server’s public key. Then the server receives it and needs the ability to decrypt it to establish a secure connection.
Therefore, even if someone would present a stolen public key certificate, this is the step they would fail. A valid private key bound to the server certificate public key is essential to decrypt the symmetric key. Of course, this is not an issue for a legitimate server as it has the private key saved securely. It can be used to decrypt the symmetric key and encrypt further communication.
So, to sum up, an SSL handshake is a process in which both symmetric and asymmetric cryptography types are used. At first, the asymmetric key pair initiates the connection and provides a safe way for the symmetric key to travel. As we pointed out at the beginning, the symmetric cryptography operations are faster, so using it for the whole communication after the setup is beneficial. Also, once a secure connection is established, it is reused until expired, so the asymmetric key setup is not done before each client request.
It’s also worth mentioning that in real life, the certificates are not signed directly by the most famous trusted CAs (called roots). Still, the root CAs sign intermediate certificates, which then finally sign the server certificate – thus creating a chain of certificates, which the connecting client checks until a valid signature is met. It certainly provides better security – when one of the intermediate CAs is compromised, it affects fewer people.
Client certificate validation
Now, there is one optional step we can briefly mention, as we have all the knowledge needed to understand it. A server can be configured to request and validate a client certificate after establishing a secure connection to achieve additional security.
That works in the same way – but this time, the client sends their certificate, and the server goes through their list of trusted certificate authorities and verifies it. It is also worth noting that the server is under the developers’ control (opposite to a client, i.e. a web browser or a mobile operating system), so the backend developers can easily modify the list of trusted certificates.
Corporate networks commonly use this mechanism. Most frequently, the client certificates are generated by a device management system installed on the employee device and are signed with a company-generated root certificate. The same certificate is also added to the backend environment. This way, the corporate backend can easily verify the certificate when the client connects.
Now, to sum up, let’s see a diagram for the whole flow:

Summary
You have reached the end of the article! Hopefully, you already understand the implementation mechanism of the encryption setup in HTTPS and the application methods of signing and encrypting processes.
Since you know how things work, you certainly should feel more confident about data encryption. Still, it is essential to remember that a green padlock in your browser does not guarantee safety yet. In the security-sensitive context, you should also examine the certificate closely. As they say, forewarned is forearmed!


